English
Svelte Native is a new approach to building mobile applications using NativeScript. NativeScript is an open source framework to build cross-platform, native iOS and Android apps without web views. Where other JavaScript mobile development frameworks like React Native and NativeScript-Vue do the bulk of their work on the mobile device, Svelte Native shifts that work into a compile step that happens when you build your app.
By using Svelte Native you can build mobile apps using the friendly web framework you already know. You can use the full power of Svelte including Transitions, Stores, and Reactivity. So you can get truly native UI and performance while sharing skills and code with the web, and have one of the smoothest development experiences available for mobile. Instead of using techniques like virtual DOM diffing, Svelte writes code that surgically updates the native view widgets when the state of your app changes.
Here we're gonna try to build some simple apps using Svelte Native. Because sometimes it can be easier to learn something if you have a goal to work towards. In this section we will build a Todo app with Svelte Native. It will have the following functionality:
- Basic design
- Two-tab layout
- One tab shows active tasks and lets you add new tasks
- Second tab lists completed tasks
- Basic functionality
- Add tasks: Users can add tasks as text
- View tasks: Newly added tasks are listed as active and can be tapped
- Complete tasks: Tapping an active task shows an action dialog with options
- Delete tasks: Tapping an active or completed task shows an action dialog with options
- Advanced design
- Input and button for adding tasks are styled
- Completed tasks are styled
This guide assumes a existing familiarity with the Svelte framework. Run through Svelte's excellent tutorial to get up to speed.
Basic Design
We will start our from a fresh app template:
$ npx degit halfnelson/svelte-native-template todoapp
$ cd todoapp
$ npm install
Remove the default .btn rule from app.css and set the contents of App.svelte to:
<page>
<actionBar title="My Tasks" />
<tabs tabsPosition="bottom">
<tabStrip>
<tabStripItem title="To Do" />
<tabStripItem title="Completed" />
</tabStrip>
<tabContentItem>
<label textWrap="true">This tab will list active tasks and will let users add new tasks.</label>
</tabContentItem>
<tabContentItem>
<label textWrap="true">This tab will list completed tasks for tracking.</label>
</tabContentItem>
</tabs>
</page>
NOTE Notice that all tags start with a lower case letter. This is different to other NativeScript implementations. The lower case letter lets the Svelte compiler know that these are NativeScript views and not Svelte components. Think of <page> and <actionBar> as just another set of application building blocks like <ul> and <div>.
What's all that then?
The <page> element is the top-level user interface element of every Svelte-Native app. All other user interface elements are nested within.
The <actionBar> element shows an action bar for the <page>. A <page> cannot contain more than one <actionBar>.
Typically, after the <actionBar>, you will have navigation components (such as a drawer or a tab view) or layout components. These elements control the layout of your app and let you determine how to place other user interface elements inside.
The <label> tags can be used differently. One has the text= attribute, while the other has the text between the opening and closing tags. Plain text between tags will be automatically assigned to the text attribute of the tag.
Progress So Far
 |
| Completed Tab |
Basic Functionality: Add Tasks
We have our basic design, lets allow the user to add some tasks.
Replace the contents of the first <tabContentItem> with:
<gridLayout columns="*,120" rows="70,*">
<!-- Configures the text field and ensures
that pressing Return on the keyboard
produces the same result as tapping the button.
-->
<textField col="0" row="0" bind:text="{textFieldValue}"
hint="Type new task..." editable="true"
on:returnPress="{onButtonTap}"
/>
<button col="1" row="0" text="Add task" on:tap="{onButtonTap}" />
<listView items="{todos}" on:itemTap="{onItemTap}"
row="1" colSpan="2"
>
<Template let:item>
<label text="{item.name}" textWrap="true" />
</Template>
</listView>
</gridLayout>
and to the bottom of the file add a script tag:
<script>
import { Template } from 'svelte-native/components'
let todos = []
let textFieldValue = ""
function onItemTap(args) {
console.log(`Item ${todos[args.index].name} at index: ${args.index} was tapped`);
}
function onButtonTap() {
// Prevents users from entering an empty string.
if (textFieldValue === "") return;
// Logs the newly added task in the console for debugging.
console.log("New task added: " + textFieldValue + ".");
// Adds tasks in the ToDo array.
// Newly added tasks are immediately shown on the screen.
todos = [{ name: textFieldValue }, ...todos];
// Clears the text field so that
// users can start adding new tasks immediately.
textFieldValue = ""; }
</script>
What did we just do?
To allow the user to enter a todo item, we need to capture the name of the task. We did this by adding a <textField>. A <button> was added to submit the task and a <listView> to display the task.
Since this functionality required adding 3 elements to the tabview, we use layouts to tell NativeScript where to place each item. Here we used a <gridLayout> to define 2 columns and 2 rows where the second column is 120dp and the first column takes all remaining space(*,120), and the first row is 70dp while the second takes the rest (70,*). We place the <textField> in the first row and column, the <button> in the first row second column (which is fixed at 120x70) and the <> in the second row spanning 2 columns (colSpan=2).
The <listView> contains a <Template> which is a Svelte component used to render each item. The template component needs to be imported just like all Svelte components.
When onButtonTap callback is fired, the code we added to the script element, will build a new todos array including the added item, and clear the text field. The onItemTap callback will just log which list item and index was tapped using console.log (which works fine in NativeScript).
NOTE <listView> will look for the first <Template> component in its children. The template component acts similar to a slot and will render its content for each item. This is exposed to the content as item via the let:item on the template element.
Progress So Far
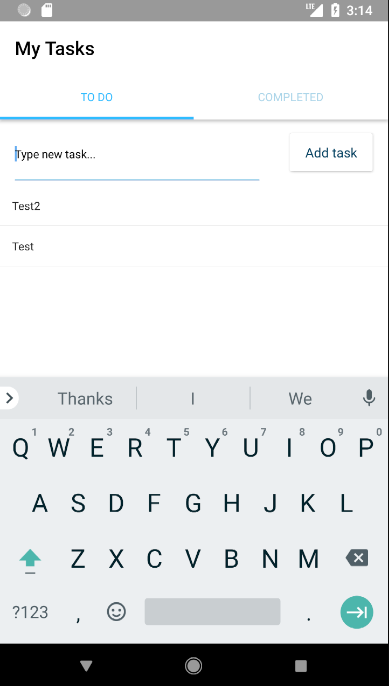 |
| Todo Tab |
As you can see, the default styling provided by Nativescript gives you a great starting point.
Basic functionality: Complete/Delete Tasks
Nobody likes a todo list that only gets longer. We should add the ability to mark a task as complete, or to remove it if we added it by accident.
Near the top of the script tag after the let todos=[], add an array for our completed tasks and some helper functions to help us manage our lists.
let dones=[] //completed items go here
const removeFromList = (list, item) => list.filter(t => t !== item);
const addToList = (list, item) => [item, ...list]
Then replace our onItemTap function with this new one:
async function onItemTap(args) {
let result = await action(
"What do you want to do with this task?",
"Cancel", [
"Mark completed",
"Delete forever"
]
);
console.log(result); // Logs the selected option for debugging.
let item = todos[args.index]
switch (result) {
case "Mark completed":
// Places the tapped active task at the top
// of the completed tasks.
dones = addToList(dones, item)
// Removes the tapped active task.
todos = removeFromList(todos, item)
break;
case "Delete forever":
// Removes the tapped active task.
todos = removeFromList(todos, item)
break;
case "Cancel" || undefined: // Dismisses the dialog
break;
}
}
Breaking it down
Native script comes with a global dialogs module that allows us to show small modal windows to obtain data from a user. We use the global action method in onItemTap. When the user selects "Mark completed" we find the item using the args.index we get from the event, and remove the item from the todos. We then add the item to our new dones array. The "Delete forever" option just removes the item from the todos.
NOTE Notice that we reassign the dones and todos variables during delete or complete operations. Svelte's reactive variables work at the top level and cannot detect changes in an array. By assigning a new value to dones and todos we are ensuring that any template that depends on those variables will be updated.
Progress So Far
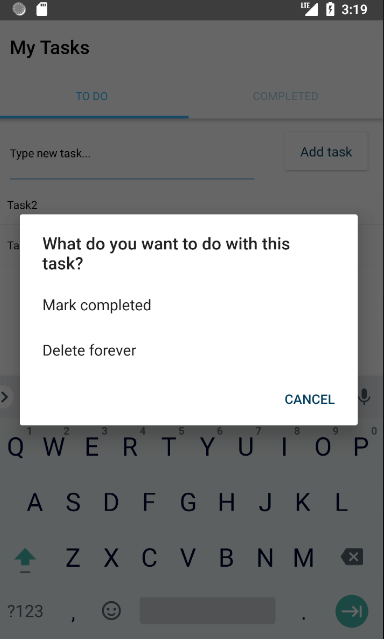 |
| Dialog on Completion |
Basic functionality: The Completed Tab
To get that sense of satisfaction from completing an item on your todo list, it would be good to be able to see the item on the completed tab. In this section we will add a listView to display the items and allow you to delete them or restore them to the todos using an action.
First add the listView below to the second tabContentItem replacing the label
<listView items="{dones}" on:itemTap="{onDoneTap}">
<Template let:item>
<label text="{item.name}" textWrap="true" />
</Template>
</listView>
Then add the code for the onDoneTap to the script block:
async function onDoneTap(args) {
let result = await action(
"What do you want to do with this task?",
"Cancel",
[
"Mark To Do",
"Delete forever"
]
);
console.log(result); // Logs the selected option for debugging.
let item = dones[args.index]
switch (result) {
case "Mark To Do":
// Places the tapped active task
// at the top of the completed tasks.
todos = addToList(todos, item)
// Removes the tapped active task.
dones = removeFromList(dones, item)
break;
case "Delete forever":
// Removes the tapped active task.
dones = removeFromList(dones, item)
break;
case "Cancel" || undefined: // Dismisses the dialog
break;
}
}
What we just did
To display our done items we added the listView to the "completed" tabContentItem and bound it to the dones variable we defined in last step.
We added an event handler to handle taps on the "completed" items. This handler is very similar to the handler added in the last section, except that it works on the dones array and not the todos.
Advanced design: Styled input
The basic functionality of the todo app is complete. But it could do with a little more styling. In this section we will style the text box and button elements.
The NativeScript core theme does a great job of default styling our application but we want to increase the importance of our button. We can do this by applying the -primary class to the button.
<button col="1" row="0"
text="Add task" on:tap="{onButtonTap}"
class="-primary"
/>
Our input text should also be more emphasised. At the bottom of App.svelte add the following style tag:
<style>
textField {
font-size: 20;
}
</style>
A style tag in a native application!?
When you work with NativeScript and Svelte, you can use application-wide CSS, scoped CSS, or inline CSS to style your app. Application-wide CSS is applied first and is handled in app.css in the root of your project. This tutorial does not explore application-wide CSS. See also: Styling.
Scoped CSS is applied to the current component only and is handled in each component's <style> block. This tutorial relies almost exclusively on scoped CSS and inline CSS. See also: Scoped Styles.
With type selectors, you can select a UI component and apply styling to it. To select a type, use the component name as provided in the code. For example, to select the button, use button{.
Progress So Far
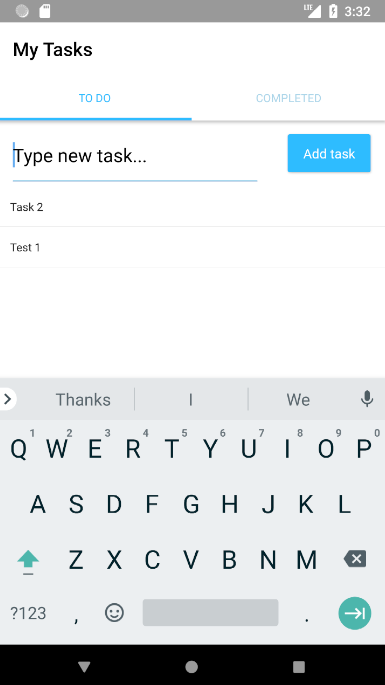 |
| New Button |
Advanced design: Styled Lists
Lets make our completed items faded and crossed out.
To the label in the listView for the dones add class="todo-item-completed"
<label text="{item.name}"
class="todo-item-completed"
textWrap="true"
/>
Add the following CSS rules to the style tag
.todo-item-completed {
color: #939393;
text-decoration: line-through;
}
I see what you did there
In NativeScript you aren't restricted to just using element names as CSS selectors. We added some classes to the labels and applied CSS rules to those classes.
Our Finished Product
 |
| Final Result Todo |
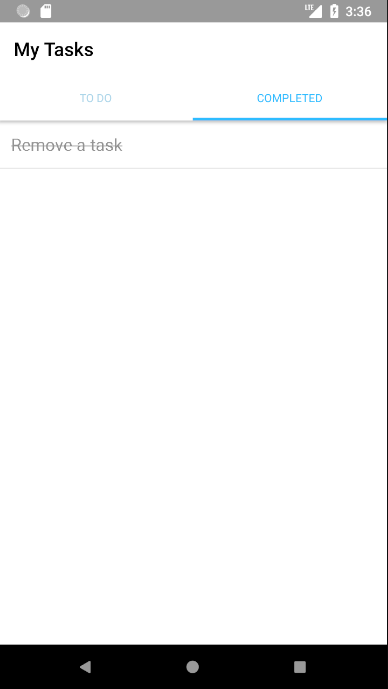 |
| Final Result Completed |
Indonesia
Svelte Native adalah cara baru untuk membuat aplikasi mobile menggunakan NativeScript. NativeScript adalah framework open source yang digunakan untuk membuat aplikasi cross platform IOs dan Android tanpa menggunakan web view. Sementara framework JavaScript lain seperti React Native dan NativeScript-Vue melakukan sebagian kerjanya di device mobile, Svelte Native memindahkan kerja itu ke dalam proses compile ketika kita mem build app kita.
Dengan menggunakan Svelte Native kita bisa membuat aplikasi mobile menggunakan framework web yang kita sudah kenal. Kita juga bisa menggunakan semua kelebihan Svelte seperti Transitions, Stores, and Reactivity. Sehingga kita bisa mendapatkan tampilan dan kinerja program Native sambil tetap memanfaatkan kemampuan dan program web kita, dan merasakan pengalaman membuat program yang mudah untuk mobile app. Daripada menggunakan teknik seperti virtual DOM diffing, Svelte membuat program yang akan meng update tampilan widget Native ketika kondisi dari aplikasi kita berubah.
Pada contoh di bawah ini kita akan coba membuat aplikasi sederhana menggunakan Svelte Native. Karena terkadang cara yang paling mudah untuk mempelajari sesuatu adalah apabila kita mempunyai suatu tujuan. Kita akan membuat aplikasi untuk mencatat Todo (=daftar tanggungan pekerjaan) dengan Svelte Native. Aplikasi ini akan mempunyai fitur sebagai berikut:
- Desain standar
- Tampilan dua tab
- Tab pertama menampilkan daftar pekerjaan (=task), dan bisa menambah pekerjaan
- Tab kedua menampilkan pekerjaan yang sudah selesai
- Fungsi standar
- Add tasks: User bisa menambah pekerjaan sebagai teks
- View tasks: Pekerjaan yang baru ditambahkan akan masuk daftar pekerjaan dan bisa di tap
- Complete tasks: Men tap di daftar pekerjaan akan memunculkan dialog dengan pilihan
- Delete tasks: Men tap di daftar pekerjaan atau pekerjaan selesai akan memunculkan dialog dengan pilihanoptions
- Desain lanjutan
- Input teks dan tombol untuk menambah pekerjaan diberi style
- Pekerjaan yang sudah selesai diberi style
Panduan ini akan menganggap kamu sudah cukup paham dengan framework Svelte. Pelajari Svelte's excellent tutorial untuk membantu proses pemahaman Svelte.
Desain Standar
Kita akan mulai membuat app dari template yang masih baru:
$ npx degit halfnelson/svelte-native-template todoapp
$ cd todoapp
$ npm install
Hapus aturan default .btn dari app.css dan rubah isi App.svelte menjadi:
<page>
<actionBar title="My Tasks" />
<tabs tabsPosition="bottom">
<tabStrip>
<tabStripItem title="To Do" />
<tabStripItem title="Completed" />
</tabStrip>
<tabContentItem>
<label textWrap="true">This tab will list active tasks and will let users add new tasks.</label>
</tabContentItem>
<tabContentItem>
<label textWrap="true">This tab will list completed tasks for tracking.</label>
</tabContentItem>
</tabs>
</page>
NOTE Perhatikan bahwa semua tag dimulai dengan huruf kecil, Ini berbeda dengan implementasi NativeScript yang lain. Huruf kecil akan membuat compiler Svelte yahu bahwa ini adalah tampilan NativeScript dan bukan komponen Svelte. Kita bisa menganalogikan <page> dan <actionBar> sebagai bagian dari pembuatan aplikasi seperti <ul> dan <div>.
Apa maksud dari program di atas?
Elemen <page> adalah elemen paling atas dari user interface setiap app Svelte-Native. Setiap elemen user interface yang lain akan ada di dalamnya.
Elemen <actionBar> akan menampilkan action bar untuk <page>. Sebuah <page> tidak bisa berisi lebih dari satu <actionBar>.
Umumnya sesudah <actionBar>, kita akan meletakkan komponen navigasi (seperti drawer atau tampilan tab) atau komponen layout. Elemen ini akan mengatur peletakan layout dari app kita dan menentukan bagaimana posisi elemen user interface di dalamnya.
Tag <label> bisa digunakan dengan 2 cara. Pertama punya atribut text=, sementara yang lainnya adalah dengan meletakkan teks di antara tag pembuka dan penutup. Teks yang terletak di antara tag akan otomatis dimasukkan ke flag atribut text.
Hasil sejauh ini
|
| Completed Tab |
Fungsi Standar: Add Tasks
Kita memiliki desain standar kita untuk menambahkan pekerjaan. Rubah isi dari <tabContentItem> pertama dengan:
<gridLayout columns="*,120" rows="70,*">
<!-- Configures the text field and ensures
that pressing Return on the keyboard
produces the same result as tapping the button.
-->
<textField col="0" row="0" bind:text="{textFieldValue}"
hint="Type new task..." editable="true"
on:returnPress="{onButtonTap}"
/>
<button col="1" row="0" text="Add task" on:tap="{onButtonTap}" />
<listView items="{todos}" on:itemTap="{onItemTap}"
row="1" colSpan="2"
>
<Template let:item>
<label text="{item.name}" textWrap="true" />
</Template>
</listView>
</gridLayout>
dan di bagian bawah dari file tambahkan tag script:
<script>
import { Template } from 'svelte-native/components'
let todos = []
let textFieldValue = ""
function onItemTap(args) {
console.log(`Item ${todos[args.index].name} at index: ${args.index} was tapped`);
}
function onButtonTap() {
// Prevents users from entering an empty string.
if (textFieldValue === "") return;
// Logs the newly added task in the console for debugging.
console.log("New task added: " + textFieldValue + ".");
// Adds tasks in the ToDo array.
// Newly added tasks are immediately shown on the screen.
todos = [{ name: textFieldValue }, ...todos];
// Clears the text field so that
// users can start adding new tasks immediately.
textFieldValue = ""; }
</script>
Apa yang baru saja kita buat?
Untuk memungkinkan user memasukkan item todo, kita butuh mendapatkan nama pekerjaannya. Kita melakukan dengan cara menambahkan <textField>. Sebuah <button> juga ditambahkan untuk men submit pekerjaan dan sebuah <listView> untuk menampilkan pekerjaan.
Karena fungsi ini membutuhkan penambahan 3 elemen di dalam tampilan tab, kita akan mengunakan layout untuk memberitahukan pada NativeScript di mana tempat meletakkan masing-masing item. Di sini kita akan menggunakan <gridLayout> untuk membuat 2 kolom dan 2 baris di mana lebar kolom kedua adalah 120dp dan kolom pertama adalah semua sisanya (*,120), dan baris pertama adalah 70dp sedangkan baris kedua adalah sisanya (70,*). Kita akan meletakkan <textField> di dalam baris pertama kolom pertama, dan <button> pada baris pertama kolom kedua (yang ukurannya pasti 120x70) dan sebuah <> di dalam baris kedua dengan lebar sepanjang 2 kolom (colSpan=2).
<listView> akan berisi <Template> yang akan digunakan komponen Svelte untuk me render masing-masing item. Komponen template perlu di impor sama seperti komponen Svelte yang lain.
Ketika callback onButtonTap dijalankan, program yang kita tambahkan ke elemen script, akan membentuk array todos yang baru, dan mengosongkan isi textfield. Callback onItemTap akan me log list item mana index berapa yang di tap menggunakan console.log (yang bekerja dengan baik dalam NativeScript).
NOTE <listView> akan mencari komponen <Template> yang pertama di dalam komponen child nya. Komponen template akan berjalan mirip dengan slot dan akan me render isinya untuk semua item. Hasilnya akan ditampilkan sebagai item melalui let:item pada elemen template.
Hasil sejauh ini
|
| Todo Tab |
Seperti yang kita liat, style default yang diberikan Nativescript memberikan tampilan awal yang bagus.
Basic functionality: Complete/Delete Tasks
Tidak ada yang suka dengan daftar todo yang hanya bisa bertambah terus. Maka kita harus menambahkan fitur untuk menandai pekerjaan sebagai sudah selesai, atau untuk menghapus pekerjaan yang tidak sengaja ditambahkan.
Di dekat bagian atas dari tag script sesudah let todos=[], tambahkan array untuk menyimpan pekerjaan yang sudah selesai dan beberapa fungsi penolong untuk membantu kita mengelola daftar todo.
let dones=[] //completed items go here
const removeFromList = (list, item) => list.filter(t => t !== item);
const addToList = (list, item) => [item, ...list]
Kemudian ganti fungsi onItemTap dengan yang baru:
async function onItemTap(args) {
let result = await action(
"What do you want to do with this task?",
"Cancel", [
"Mark completed",
"Delete forever"
]
);
console.log(result); // Logs the selected option for debugging.
let item = todos[args.index]
switch (result) {
case "Mark completed":
// Places the tapped active task at the top
// of the completed tasks.
dones = addToList(dones, item)
// Removes the tapped active task.
todos = removeFromList(todos, item)
break;
case "Delete forever":
// Removes the tapped active task.
todos = removeFromList(todos, item)
break;
case "Cancel" || undefined: // Dismisses the dialog
break;
}
}
Penjelasan satu per satu
NativeScript dilengkapi dengan modul global dialogs yang memungkinkan kita untuk menampilkan window modal kecil untuk menerima data dari user. Kita menggunakan method global action di dalam onItemTap. Ketika user memilih "Mark completed" kita bisa mendapatkan item dengan menggunakan args.index yang kita dapatkan dari event, dan menghapus item dari todos. Kemudian kita menambahkan item tersebut ke dalam array dones. Pilihan "Delete forever" hanya menghapus item dari todos.
NOTE Perhatikan bahwa kita melakukan reassign variabel dones dan todos selama melakukan operasi delete atau completed. Variabel reaktif dari Svelte bekerja pada level di atasnya dan tidak bisa mendeteksi perubahan pada array, dengan meng assign nilai baru ke dalam dones dan todos kita memastikan semua template yang berhubungan dengan variabel itu akan ter update.
Hasil sejauh ini
|
| Dialog on Completion |
Fungsi Standar: Tab Completed
Untuk bisa memberikan rasa kepuasan kepada user sesudah menyelesaikan item di daftar todo, makan akan lebih baik jika mereka bisa melihat item tersebut di tab completed. Pada sesi ini kita akan menambahkan listView untuk menampilkan item completed dan memungkinkan kita untuk menghapus atau mengembalikan ke todo menggunakan sebuah action.
Pertama, tambahkan listView di bawah ke tabContentItem kedua menggantikan label
<listView items="{dones}" on:itemTap="{onDoneTap}">
<Template let:item>
<label text="{item.name}" textWrap="true" />
</Template>
</listView>
Kemudian tambahkan program untuk onDoneTap ke dalam blok script:
async function onDoneTap(args) {
let result = await action(
"What do you want to do with this task?",
"Cancel",
[
"Mark To Do",
"Delete forever"
]
);
console.log(result); // Logs the selected option for debugging.
let item = dones[args.index]
switch (result) {
case "Mark To Do":
// Places the tapped active task
// at the top of the completed tasks.
todos = addToList(todos, item)
// Removes the tapped active task.
dones = removeFromList(dones, item)
break;
case "Delete forever":
// Removes the tapped active task.
dones = removeFromList(dones, item)
break;
case "Cancel" || undefined: // Dismisses the dialog
break;
}
}
Apa yang baru saja kita buat
Untuk menampilkan item yang sudah diselesaikan kita menambahkan listView ke dalam tabContentItem "completed" dan melakukan bing ke variabel dones yang kita definisikan pada langkah terakhir.
Kita menambahkan event handler untuk mengatur tap yang terjadi pada items "completed". Handler ini mirip dengan handler yang kita tambahkan di sesi terakhir, kecuali dia bekerja pada array dones dan bukan pada todos.
Desain Lanjutan: Input yang diberikan Style
Fungsi dasar dari app todo sudah selesai. Tapi app ini akan bisa lebih baik dengan menambahkan style lebih lanjut. Dalam sesi ini kita akan memberikan style pada elemen text box dan button.
NativeScript core theme sudah memberikan style default yang sangat bagus untuk aplikasi kita, tapi kita masih ingin memberikan penekanan pentingnya button di aplikasi. Kita bisa melakukan ini dengan cara memberikan class-primary pada button.
<button col="1" row="0"
text="Add task" on:tap="{onButtonTap}"
class="-primary"
/>
Input teks juga perlu lebih ditonjolkan. Pada bagian bawah dari App.svelte tambahkan tag style berikut:
<style>
textField {
font-size: 20;
}
</style>
Tag style di dalam aplikasi Native!?
Ketika kita bekerja dengan NativeScript dan Svelte, kita bisa menggunakan CSS untuk keseluruhan app, CSS dengan scope tertentu, atau CSS inline untuk memberikan style dalam app kita. Aplikasi untuk keseluruhan app akan dijalankan terlebih dahulu dan akan dimasukkan di dalam app.css pada root project kita. Tutorial ini tidak memberikan contoh CSS untuk keseluruhan aplikasi. Lihat juga: Styling.
CSS dengan scope akan dijalankan pada komponen itu saja dan dimasukkan dalam blok <style> di dalam masing-masing komponen. Tutorial ini sepenuhnya hanya akan menggunakan CSS dengan scope dan CSS inline. Lihat juga: Scoped Styles.
Dengan selector, kita bisa memillih komponen UI dan memberikan style pada komponen tersebut. Untuk memilih suatu elemen, gunakan nama komponen seperti yang ada dalam program, contohnya untuk memilih button, gunakan selector button{.
Hasil sejauh ini
|
| New Button |
Desain Lanjutan: List yang diberikan Style
Kita akan membuat item yang sudah completed lebih pudar dan dicoret.
Pada label di dalam listView untuk dones tambahkan class="todo-item-completed"
<label text="{item.name}"
class="todo-item-completed"
textWrap="true"
/>
Tambahkan aturan CSS ini pada tag style:
.todo-item-completed {
color: #939393;
text-decoration: line-through;
}
Mari lihat apa yang sudah kita buat..
Di dalam NativeScript, kita tidak dibatasi hanya menggunakan nama elemen untuk selector CSS. Kita bisa menambahkan class pada label dan memberikan CSS untuk class tersebut.
Hasil jadi aplikasi todo
|
| Final Result Todo |
|
| Final Result Completed |